Category Archives: Technique

How To Brew Mönchsambacher Weihnachts-Bock, according to the brewmaster

At HBCon 2024 (more about the event here), one of the sessions I attended was a seminar about how to brew easy-drinking Bockbier. Basically, brewmaster Stefan Zehendner told us all the details about the beer, the idea an concept behind, everything about the ingredients and the brewing process, and of course lots of little details and anecdotes.

A lot of information about that particular beer can already be found in this article in Craft Beer & Brewing, and if you’re a subscriber to that magazine, there’s even a home-brew recipe available.

Mönchsambacher produces a total of about 6000 hl of beer per year, with no intention of further growing the business. Of this, about 1,500 crates (i.e. 150 hl) is Weihnachts-Bock, which is usually sold out within a week.

The Weihnachts-Bock has about 17.5 to 18 °P original gravity. To achieve consistency, all the lager tanks are blended into one beer during packaging. It has about 3.3 to 3.5 °P residual extract, and is hopped to 48 IBU. Compared to the brewery’s other beers, this CO2 content is slightly higher, making this whole beer a hop-forward, not too sweet, well-integrated beer.

The brewmaster considers his brewing water to be one of the keys to his beer. The water is very hard: 28 °dH (German degrees of hardness), where 1° equals 0.1783 mmol/l. About 13 to 14 °dH are magnesium, and about the same amount is calcium, much of it bound to sulfate. This hardness results in a higher mash pH for the Bock, around 5.6 to 5.7.

The grist is simple: 100% Pilsner malt. As many other local breweries, Mönchsambacher gets their malt from local maltings Bamberger Malz. The grist is also used for all the other bottom-fermented beers, except for the Festbier, which is brewed from a 50/50 blend of Pilsner and Vienna malt. The Pilsner malt from Bamberger Malz is slightly less modified.

This is what the mash schedule looks like:

The grist is mashed in at 45°C, then rested for 10 minutes.

Then the mash is heated up to 52°C, for another 10 minute rest.

After this rest, the mash is heated up to 62°C, and the first (and only) decoction is pulled: about one third of the mash volume (relatively thin mash) is pumped into the kettle, brought up to 72°C and rested for 15 minutes for saccharification. It is then brought to a boil and boiled for 5 minutes before it is mixed back.

Stefan called this decoction to be important for the bright golden colour of the beer and a more robust (he used the word kernig which is impossible for me to translate) body.

After mixing the decoction back, the mash should have reached 72°C. It is then left to saccharify for another 20 minutes, after which it is heated up to 78°C, which is when lautering starts.

The wort is boiled for a total of 75 minutes. The only hop variety used in the brewery is Perle. In the case of the Weihnachts-Bock, the hops are added at 3 points: at the beginning of the boil, 25 minutes before the end of the boil, and in the whirlpool. The hops in the whirlpool are added beforehand, so it has 10 minutes of contact while the wort is pumped into the whirlpool, and then left for a trub cone to form for another 15 minutes until the wort is pumped out of the whirlpool.

The wort is then chilled to 7.5°C, yeast is pitched, and fermentation happens at 9.2°C. The brewmaster said the yeast strain they use is W-34/72 which they get delivered from Speckner yeast lab in Augsburg. I’ve not been able to find that particular strain in Speckner’s list of available strain, so this is probably a matter of miscommunication (Speckner has W-34/70 and W-34/78 in their portfolio). In any case, Zehendner finds the water much more important than the yeast, so for home-brewers, W-34/70 is probably totally sufficient.

What is important though is that the yeast must have gotten used to the brewery before it is used for fermenting the Weihnachts-Bock. So any yeast going into Weihnachts-Bock has been pitched once or twice before.

Fermentation takes 13 days in tanks which are left open, so it is effectively open fermentation. Before moving the beer into lagering tanks, Kräusen (freshly fermenting beer) from another tank is added at about 10% before it is lagered to ensure a very clean secondary fermentation/lagering. Lagering itself happens at 2°C for a total of 12 weeks, with fermentation slowly progressing for 10 weeks.

The last time this recipe has changed was when the brewery upgraded their brew system in 2000. As part of the adjustments, the number of decoctions was reduced from 2 to 1, and because they had sold the coolship, the hop addition had to be removed. Because there was no more coolship, the whirlpool was instead chosen to have a similar geometry so that the wort can “stink out” in the same way, so basically that DMS and other unwanted chemical compounds can evaporate in the same way and at the same rate.

When the beer is bottled, it is always unfiltered. Zehendner considers a bit of yeast to be absolutely vital to have a beer that can age well. Apparently, the beer will ferment a little bit more after bottling, so practically, the Weihnachts-Bock is a bottle-conditioned beer. The best before date is 3 months for the Weihnachts-Bock and just 5 weeks for the regular Lager. The main reason for the short date is that the beer changes in the bottle, and slowly loses its sulphur notes, making it taste different from what regular drinkers expect. Mönchsambacher also keeps their bottled beers chilled at all times, and are selling it chilled directly from the brewery.

Something that I had never heard before was the anecdote of a pediococcus infection they struggled with for about a year. Pediococcus is a bacteria that makes beer go “ropey”, it gives it a slimey texture and leaves behind plenty of diacetyl. They struggled with such an infection on and off for about a year, until they finally discovered the unlikely source of the infection: the water source! After spending about €80,000 on a membrane filter, this has finally been cleaned up and now the brewery is infection-free again. The brewmaster pointed out that the water treatment with chlorine dioxide would have been another option, but he decided against it specifically because he thinks that it could also negatively affect yeast health in the long run.

Still, this is the only time where I’ve heard that the infection vector of a brewery was the water. It is quite insidious: after disinfecting the whole brewery, all it needs is some water to rinse off disinfectants, and you got the infection back on your equipment.

Stefan Zehendner is not just a traditional Franconian brewer, he also likes to experiment: recently, they filled a batch of Weihnachts-Bock into a wine cask that was previously filled with spontaneously fermented Silvaner wine. In the future, he’s also thinking about producing Weihnachts-Bock wort and getting it fermented somewhere else as a sour beer, which also sounds absolutely intriguing. And apparently if you visit the brewery taproom at the right times, there’s a chance that a keg of Cantillon might be on, about the last beer you’d expect in Franconia.

The process I described here does not just apply to the Weihnachts-Bock, but their other Bock, the Maibock, is also brewed essentially the same way. The only differences are a slightly reduced original gravity of 16.5°P and a reduced bitterness of about 40 IBU.

And that’s how you brew Mönchsambacher Weihnachts-Bock, based on all my notes from the session at Heimbrau Convention 2024. I think this description is complete enough to brew a pretty faithful clone at home.

Why a Triple Decoction Mash Can Never Fail

I’m currently working on a new project, so as part of that, I’ve been reading quite a few historic descriptions of decoction mashing, in particular triple decoction which historic literature generally describes as the standard mash schedule in Bavaria, Bohemia and Austria around the 1870’s-1880’s.

When I played a bit with calculating the right mash volumes and the mash temperatures, I stumbled upon an interesting property of standard triple decoction: you can’t get it wrong. You actually have to actively try and sabotage it for it to fail.

This is a really cool thing because triple decoction sounds so ancient and complicated and easy to do wrong, and I think that scares a lot of people who then shy away from trying it out, but if you follow a few simple principles, you can’t go wrong at all.

These principles are:

  • always pull 1/3 of your total mash volume as decoction
  • pull the first and second decoction thick (i.e. mostly malt with little liquid), and the third decoction thin (i.e. mostly liquid)
  • bring each decoction to a boil, boil for a bit, then mix back into main mash
  • make sure you measure your volumes exactly, work quickly when mixing back, but also mix thoroughly
  • when doughing in, give the enzymes some time to get dissolved before starting to pull your first decoction

From a historic point of view, triple decoction was a reliable method to guide your mash through a number of particular ranges of rest temperatures to facilitate the activity of specific enzymes to convert long proteins into shorter protein chains and to convert starch into simple sugar molecules and shorter dextrin chains to both achieve a fermentable wort and a good mouthfeel, without requiring a thermometer.

And when you apply some maths, and draw a pretty graph, it really shows that all you need is the ability to vaguely judge your initial mash temperature to be between somewhere slightly above room temperature and slightly below tepid, and everything falls right into place, provided you follow the principles above.

The general equation to calculate your decoction volume is:

decoction volume = total mash volume * (target temperature – start temperature ) / ( boil temperature – start temperature)

If we assume the total mash volume to be 1, and our decoction volume to be 1/3, we can rewrite this to

target temperature = start temperature + 1/3 * (boil temperature – start temperature )

Based on this, we can easily calculate whole temperature series if all we do is repeatedly pull decoctions that are 1/3 of the whole mash volume, bring them to a boil, and mix them back.

I’ve done this in a spreadsheet, and put this into a nice temperature/time chart to indicate the time schedule your mash steps would follow. In total, I’ve done this with four different initial temperatures: 20, 25, 30 and 35 °C. This is a rather wide temperature range, but it’s also one where most people could easily and correctly judge whether a liquid is within that temperature range just by feeling with their finger or elbow. To keep the chart readable, I’ve only added the main mash temperature, and left out the temperature curves of the decoctions. To account for cooling during mixing back, especially so on a homebrew scale, I assumed a boiling temperature of 95 °C instead of 100 °C.

Triple Decoction Mash Temperatures

In addition, I’ve marked the temperature ranges in which you reasonably want to keep your mash to do a protein rest, as well as to give the alpha and beta amylases good conditions to do their work.

When you now look at the chart, it is very noticeable that at all stages (protein rest, maltose rest, saccharification rest/mash-out), all our target temperatures fall within the desired temperature ranges. The further we go, the more all the temperature curves converge towards a narrower and narrower temperature range, even though we started with a very wide one. This makes it very hard to screw up, even if you e.g. slightly miss your target temperature after your first decoction: you will still be well within the desired temperature range.

In addition to that, when you bring up your decoctions, in particular the first one, to a boil, they go through these temperature ranges as well. Some modern mash schedules recommend doing at least a saccharification rest to optimally use the enzymes that will later get destroyed, so you can have an infusion step mash within your decoction. Even if you don’t do it, unless you heat up very quickly, your decoction will at least partially convert when you heat it up.

And this is why your triple decoction mash can never fail: when bringing your decoctions to a boil, they will partially, if not mostly, convert, and then release more starch during the boil, which will then be fully converted in the main mash. There are two decoctions where the enzymes get into the right temperature range to convert starch into sugar, and there are two rest steps where the enzymes have even more time to convert more starch into sugar. Your whole mash goes through the right temperature so many times, it will eventually be fully converted. And to get into these right temperature ranges, all you need to do is follow a few simple principles. And if you want, you could even do this totally without a thermometer.

For most modern malts, triple decoction is possibly a bit to harsh, in particular when it comes to the extended protein rest which could potentially be very damaging to foam stability. For this, you can also employ an enhanced double decoction, in which you start at the same temperature as a triple decoction, but pull double the volume for the first decoction, and do a step mash of your first decoction before boiling it. That way you keep the intense treatment of your malt, but can keep the time within the protein rest range to an absolute minimum.

The Theory of Brewing Reinheitsgebot-Compliant Brut IPA

Watch out, NEIPA, there’s a new fad in town: Brut IPA. If you haven’t heard of it yet, Brut IPA is a new IPA-inspired beer style with a dry body, low bitterness, high hop flavour and aroma, and high carbonation. One core element of achieving such a dry and hoppy but not bitter beer is to only add hops during flame-out or whirlpool, to dry-hop in the fermenter, and most importantly, to use enzymes during fermentation to convert any remaining complex sugars into simple sugars that the yeast can turn into alcohol and carbon dioxide. This unique combination of dryness, hop aroma, and high carbonation apparently gives the beer a very unique mouthfeel and sensory experience otherwise only found in highly attenuated and carbonated styles like Saison.

Brut IPAs haven’t really arrived in Germany yet (I hear there’s one or two small breweries releasing some), so I haven’t had the chance to try any examples yet. But from everything I’ve read so far, professional brewers who have done the style emphasize the use of enzymes to produce a highly attenuated beer. The problem with brewing such a beer in Germany is that enzymes would be an additional ingredient that’s currently normally not allowed to be used in brewing. So how would a brewer get around it?

Maybe let’s just first talk what the enzymes really are about. Basically, malt contains enzymes, called amylase (alpha amylase and beta amylase, to be more precise) , that break long starch chains into shorter bits. Beta amylase chops off simple sugar on the end of such a starch chain, while alpha amylase chops it up at any point of the chain, producing shorter and shorter chains, eventually ending up with unfermentable dextrins, or given enough time, simple, fermentable sugars. It’s the foundation of mashing, really. These amylase enzymes work at an optimal temperature range, depending on the specific type, between roughly 60 and 75 °C.

The thing with enzymes in Brut IPAs is that they are often added to the wort at the beginning of or during fermentation. A common product for that is glucoamylase, also known as amyloglucosidase or gamma amylase. While its optimum temperature is about 65 °C, it will still work at normal fermentation temperature and help with chopping up the last few remaining dextrins into fermentable sugars.

So, if German pro-brewers aren’t allowed to use enzymes to add to the fermenting beer, how else would they be able to achieve such a highly attenuated beer? Fortunately, there’s a precedent in recent German beer history. In Germany, you used to be able to buy Diätbier (“diet bier”) until the use of the term was prohibited in 2012. Diätbier is essentially a fully attenuated beer with no carbohydrates in it left, and it used to be advertised to be suitable for diabetics. This of course ignored the fact that alcohol changes the way sugar is absorbed by the body, and was one of the reason why Diätbier is not a thing anymore. But how Diätbier was free from carbohydrates is what made it similar to Brut IPA. So if we wanted to brew a Brut IPA that complies with German beer legislation, all we needed to do was to brew it just like German brewers used to brew Diätbier. There are a few approaches, which I’ll describe here:

The crudest and simplest approach is to just add a certain amount of barley malt flour to the chilled wort or freshly fermenting beer. The amylase in the beer will get active and not only convert the starch from the barley malt flour, but also any remaining dextrins, and given enough time, produce a beer with no residual extract. The risk there is that not all the starch will actually get converted, and starches in the final beer can have a negative impact on the overall shelf stability.

A better way and slightly more sophisticated way is to just take some of the mash when it’s at 60 °C to make sure none of the enzymes have been damaged, lauter it, put the wort aside, and continue brewing as normal. When the main wort is chilled and yeast has been pitched, the wort put aside earlier can be added to it, and the enzymes now have time to convert the remaining complex sugars and dextrins.

But wort can easily spoil, so you can go even further and produce a sotrable malt extract that can be used as enzyme source in brewing by mashing in malt at up to 65 °C, lautering, chilling, and then fermenting it. Without a boil, none of the enzymes should get denatured. The resulting unboiled beer can then be filtered to free it from proteins and yeast and kept for a longer period of time. Since it’s beer, it can be blended with other beer and still totally be within the purity law. This method was even patented in the 1980’s to a German company.

Practically, it’s probably the easiest for homebrewers to use the unboiled wort method. I would consider using barley malt flour to be unsafe, not just because of the risk of introducing starches into beer, but also for a slight contamination risk. Fermenting and filtering an enzyme-rich wort is probably also not great for homebrewers as you need to plan ahead and actually have the equipment and facilities to filter and package the beer in an contaminant-free environment. So the easiest is just to take a bit of wort during the mash, set it aside, and then add it to the fermenter a few hours later.

There’s also another way of achieving such high attenuation: super-attenuating yeast. There exist variants of brewers yeast, such as Saccharomyces cerevisiae var. diastaticus, that produce their own glucoamylase to help with converting starches and dextrines. Saison yeast is a well-known example for this type of yeast. Unfortunately, most diastaticus yeasts are also known for producing phenolic off-flavours (they are “phenolic off-flavour positive”, or POF+). In Saisons, these phenols are appropriate, while in other beer styles, such as IPAs, where the hop flavour and aroma should shine, probably not so much. So far, there are only two known diastaticus strains that are POF- (i.e. don’t produce phenolic off-flavours), which are WLP026 (an English ale yeast) and WLP644 (a yeast that had previously been misidentified as Brettanomyces since it is known for producing some funky, Brett-like aromas and flavours). This method is probably most suitable if you want to produce a “Belgian-style” or funky Brut IPA.

So, to summarize, if you want to brew a Brut IPA, and for whatever reason, have to stick to German beer legislation, and can’t or don’t want to add enzymes to your beer, or you can’t buy any glucoamylase in your homebrew shop, here’s a method that has been used in the past to produce very dry, highly attenuated beers. Just be aware that I haven’t actually tried this method in practice. Not only is it slightly too warm to brew beer unless you have good temperature control, I also didn’t really have time recently to brew much. This is just based on theory I read about in German brewing books.

If you want to learn more about Brut IPA, there’s been quite a lot of good stuff out there recently.  The Craft Beer & Brewing Magazine‘s August-September 2018 issue has a focus on IPAs, with a great article specifically about Brut IPAs. The New To Brew blog also posted an article about how to design and brew Brut IPAs back in June. So if you want to brew the latest hyped sub-style of IPA, there’s plenty of material how to do it right.

#BeeryLongReads2018: Revisiting Brewing Methods

More than two years ago, I wrote an article discerning accounts from 1834 about various brewing methods as they were practiced in Germany and Austria, in particular Munich, Augsburg, Prague and Vienna, as part of #BeeryLongReads. I even won great prizes for it:

A lot has happened since then, not only did I gain more experience in blogging, I also published a book about historic beer stuff. So this time, I want to follow up on the theme and discuss the specific differences in decoction mashing from a late 19th century point of view.

Franz Cassian published a book named “Die Dampf-Brauerei. Eine Darstellung des gesammten Brauwesens nach dem neuesten Stande des Gewerbes.” in 1887 in which he talks about the state of the art of brewing at that time. I only came across this book recently, and found it particularly interesting because it contains a whole section with nothing but detailed descriptions of various types of decoction mashing and their differences.

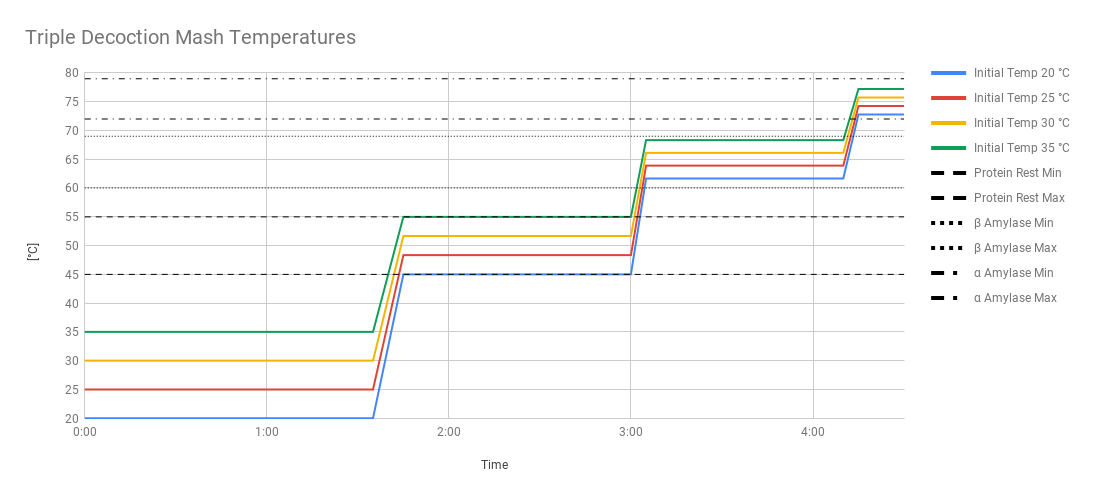
Now, if you’ve never heard of decoction mashing before, let me just quickly describe it to you: when brewing a beer, the brewer uses the enzymes in the malt combined with hot water to convert the starches in the malt to sugar. In order for the enzymes to work under optimal conditions, this needs to happen at certain temperatures. Different enzymes do their stuff at different temperatures, so if you wanted to activate the enzymes to do their thing, you’d go through these different temperature steps so that each of them can work under optimal conditions. There are essentially three different ways of doing this:

  1. by adding more hot or boiling water (which can make the mash very thin)
  2. by heating up the mash until the right temperature is reached (which can be tricky if you don’t have exact temperature control)
  3. by taking a part of the mash, boiling it, and mixing it back (which takes a long time and uses up a lot of energy and fuel)

Some brewing traditions even just keep a single temperature, but in some ways, they’re just a simplification of methods (1) and (2), which nowadays are called infusion mashing. Method (3) on the other hand is called decoction mashing and is very traditional in Bavaria, Bohemia and Austria to a certain extent, and only used to be practiced there. At the time, brewers swore by it and exclaimed that decoction mashing was absolutely essential for their local beer style. Even today, decoction mashing is necessary in the Czech Republic if a brewer wants to call their beer a Czech beer.

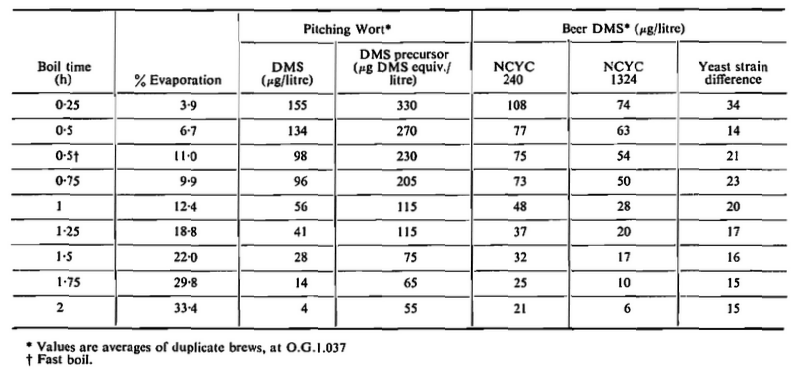
Modern German breweries have gone off it for various reasons though: energy efficiency is one of them, as infusion mashing doesn’t use up nearly as much energy. Another reason is the perceived lack of impact on quality. This is relatively controversial, but there exist studies that claim that the difference of decoction mashing and infusion mashing cannot be smelled or tasted by your average Joe beer consumer, while some brewers still swear by it. An experiment at Brulosophy that compared whether people could taste a difference between triple-decocted beer and one produced by single infusion mash failed to gain significance. Upon closer analytical examination, differences between worts and beers produced through infusion mashing resp. single, double and triple decoction mashing can be measured.

Decoction mashing nowadays is mostly distinguished by how many decoctions are pulled (1, 2 or 3), the consistency of the decoctions (thick or thin), and which temperature steps you’re going through. With modern brewing science as a helpful tool, we exactly know what’s happening at each temperature step and which enzymes will be the most active, and we know about the destructive force boiling a decoction wields on the diastatic power (the ability to convert starches to sugar) of the partial mash. Even though brewing science in the late 19th century had already made great progress, brewing as such was still a craft and findings of brewing science were not necessarily immediately incorporated into the knowledge and toolset of a brewer.

With this context, let’s look at what Franz Cassian wrote about the specific styles of decoction mashing. He distinguishes three main methods, the Munich method, the Viennese method, and the Bohemian method. He identifies two main differences between those three methods: first, the type of malt that is used in mashing, and second, the way the mash is treated in relation to temperature, the number and consistency of individual decoctions, as well as boiling durations. The rest of the operation, like boiling and chilling the wort as well as fermenting and lagering the beer, he says, are essentially the same.

He then goes on to describe the different malts that are used for each of these methods: for the Munich method, highly kilned malts are being used, while for the Viennese method, the malt used produces a beer with reddish-brown colour that is lighter than Munich beers. The malt itself is very aromatic. The typical malt for Bohemian beers, he writes, is very pale, leading to an almost wine-like colour of the beer. The malt is kilned as such low temperatures that the author describes them more as dried than kilned. He also mentions an interesting detail: some Munich breweries at that time had started kilning their malt to a lower temperature, and then adjusted the colour of the beer with Farbebier.

Farbebier, literally “colouring beer”, is an extremely dark beer made from large amounts of debittered roasted malt that can be used to adjust the colour of beer without imparting the beer with too much roasted aroma and flavour. Since it’s just beer, mixing Farbebier with pale beer was compliant with the Bavarian prohibition on adulterating beer or substituting its ingredients. It was the only legal food colouring for beer at that time, and still is to this day if you want to advertise your beer as being compliant to the Reinheitsgebot.

Kilning at lower temperatures has a good technical reason: it destroys fewer of the enzymes that are required for starch conversion, and makes the malt more convertible, which in turn makes it easier for brewers to work with it. Using Farbebier was really just for matching customer expectations. This is what some Munich breweries allegedly still do nowadays: American beer consumers expect an Oktoberfest beer to be amber-coloured instead of the golden colour of modern Festbier, so Farbebier is used to adjust the colour for the American exports without impacting the flavour.

This description with Bohemian malt being the palest, Munich malt being the darkest and Viennese malt being in-between these two also reflects modern base malts: many maltings in Germany will produce and trade at most three base malts: Munich malt, Vienna malt and Pilsner malt. Only a few specialty malt producers offer a wider range of base malts, from extra-pale malt even paler than Pilsner malt, to Pale Ale malts more suitable for British and American styles, to proprietary malt blends for producing wort with a distinct red hue.

Besides the malt, the even more important distinction in brewing methods was the mashing itself. For Bavarian mashing, the author distinguishes four types: the old Munich or old Bavarian method, the new Munich method, the Augsburg method, and the Franconian method.
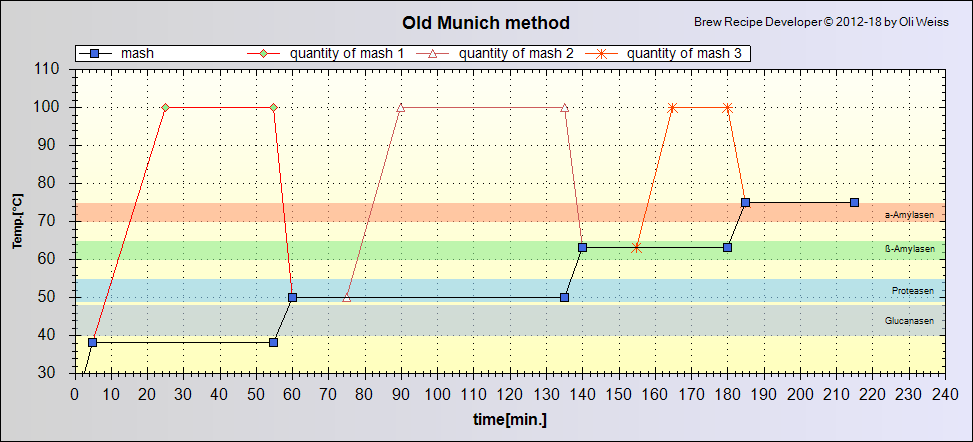
Old Bavarian Method

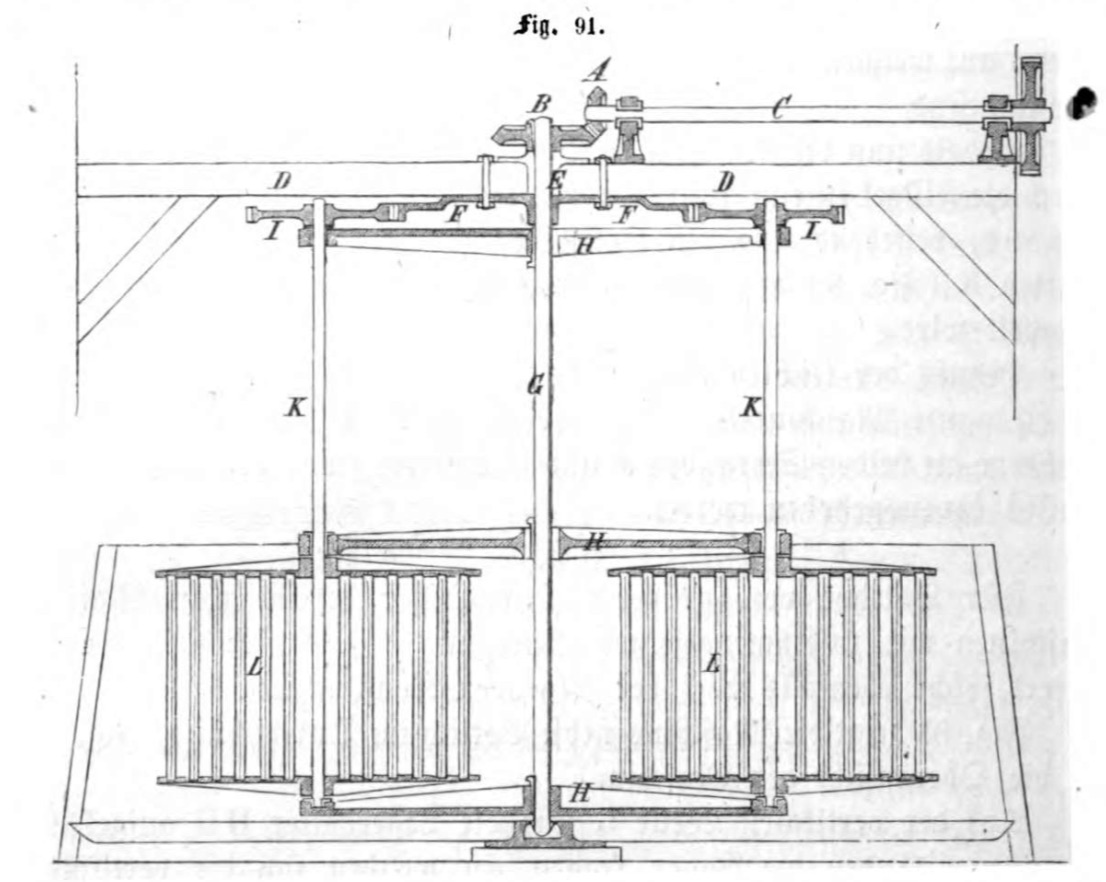
At the time of the publication of this book, this method was barely in use anymore. It used to be common for primitive breweries with not a whole lot of equipment, so most of the work was manual labour: mashing and lautering was done in the same vessel, so mash tuns had a false bottom, stirring was only done by hand, and hot water was added through simple tubes attached on the side of the mash tun going underneath the false bottom. Underneath the mash/lauter tun, another vessel, the “Grand”, was installed, which was large enough to contain all the collected wort.

The brewing process worked like this: for every unit of malt (by weight), 8 times that amount in water was required. One third of the water is added to the mash tun, while the rest is slowly brought to a boil. While the water heats up, the malt is doughed in. Bringing the water to a boil could take 3 to 4 hours, so that’s how long the malt was doughed in at a cool temperature. When the water is boiling, it is added very slowly to the mash, and mixed thoroughly, so that when all the boiling water is mixed in, the mash is at a temperature of about 37 to 38 °C.

Immediately, one third of the volume (as a thick mash) is put back into the copper, and quickly brought to a boil, where it is boiled for half an hour and then slowly mixed back into the main mash while constantly stirring. The resulting temperature of the mash should then be at about 45 to 50 °C, and will be mashed (stirred) for another 15 minutes to liquefy the mash. Then again, a third of the volume (again a thick mash) is put into the copper, and boiled for 45 minutes, and again slowly mixed back to reach a mash temperature of 60 to 63 °C. More stirring happens for 15 minutes, until the the third decoction can happen:

A third of the mash, this time a thin mash, is put into the copper, boiled for 15 minutes, and – you should know the drill by now – slowly mix it back under constant stirring to reach 73 to 75 °C. With that, the mash boiling is concluded, but not the mash itself: it gets stirred until the mash is fully converted. Nowadays, this would be verified with an iodine test (an iodine solution turns from brown to blue if the mash still contains unconverted starches), but back then it was determined by how quickly the hard matter in a sample of the mash sinks down the bottom of the vessel.

When mashing is concluded, it rests so that the grains can sink to the bottom of the vessel, which usually takes 30 minutes. Then the tap of the lauter tun is opened and the first wort is drawn into buckets. The wort is poured back onto the mash until it runs clear, then the wort is collected in the Grand, from where it is transferred to the copper. The grains are then further rinsed by pouring hot water on top: 30 liters per 100 kg of malt. The resulting wort is added to the wort. More hot water is then poured on top of the grains, at 50 to 60 liters per 100 kg of malt, and the resulting wort is used to brew a weak beer called “Schöps”. The final runnings, at 30 to 40 liters per 100 kg of malt, are called the Glattwasser and are used for distilling.

New Munich Method

Unlike the old Bavarian method, the new Munich method employs more sophisticated equipment and a certain degree of automation using steam engines. Mash and lauter tuns are separate, and no full-sized Grand is used anymore. Doughing in happens with a pre-masher, and the initial mash temperature is reached by using water from a hot liquor tank. The Mash tun is set higher than other equipment so that decoctions can be transported using gravity, and mixed back using pumps. Like the old method, the new method still employs three decoctions, two thick ones and a final thin one. But due to the high degree of automation, exact timing, and a hot liquor tank that can be used for quick temperature corrections, the whole process is meant to be quicker and more precise and therefore more reproducible and repeatable.

The temperature steps are slightly different: the first decoction is drawn at 30 °C and boiled for 15 to 45 minutes to bring the mash to 55 °C. The second decoction is boiled for 15 to 45 minutes to bring the mash to 65 °C, and the final thin decoction is boiled for 30 to 45 minutes to bring the mash to 75 °C. The amount of sparge water that is used is two thirds of the initial water volume.

Augsburg Method

The typical method for Augsburg is “auf Satz brauen”, which is pretty unique and quite different from the class Bavarian or Munich decoction. The ratio of malt to water is 1:6 by weight. The mash tun has a false bottom, which gets covered with hop leafs to help prevent the mash from getting sour through lactic acid fermentation. Doughing in is done with so much cold water that the resulting mash is quite thin and easy to stir, and then rested for 4 to 5 hours. Then the cold malt extract (you probably can’t call it wort yet), called “kalter Satz”, is then drawn off and put aside. The rest of the water is brought to a boil, and then a few liters (unfortunately, the author is not very clear here) of the kalter Satz are added to the boiling water which makes the proteins in it coagulate. The proteins are removed, then the hot water is slowly mixed into the drained main mash that has been hacked up before. After all the hot water has been added, the kalter Satz is also mixed back into the main mash, after which it should have a temperature of 60 to 65 °C.

Then the mash is stirred until it has properly liquefied, only to rest 15 minutes before the “warmer Satz” is drawn off. This is just like lautering: first, wort is drawn off and poured back into the mash until it runs clear. Of all the wort, two thirds go into the copper, while one third is put aside. The wort in the copper is brought to a boil as slowly as possible to maximize the amount of hot break for a clearer wort. The boiling wort is poured back into the main mash, which again should have a temperature of about 65 °C. At that point, the mash shall be stirred to continue starch conversion.

Then, the thick portion of the mash is drawn off into the copper and boiled for up to 2 hours, until no more hot break appears on the surface. It is then mixed back into the main mash to get it up to 70 °C. Then, the wort that was set aside is added to the copper, hops are added, and the main mash is lautered and also added to the copper. This wort is then slowly brought to a boil.

In the late 19th century, this method was considered to be completely outdated, and only practiced in Augsburg. It was hard to scale it up to larger amounts, and suffered greatly from issues of the mash getting sour during the whole process. Beer made using it was described to be very full-bodied and less perishable than other Bavarian beers.

Franconian Method

The Franconian method, as described by Franz Cassian, is a single step decoction mash. The malt to wort ratio (by weight) is 1:6 to 1:7. Hot water of 80 to 85 °C is thoroughly mixed with the malt to reach about 60 to 65 °C and then rested until all hard matter has sunk to the bottom of the mash tun. Then, all the wort is drawn off and brought to a boil. All hot break is thoroughly removed, and the wort is boiled for 45 minutes. After that, it is mixed back into the mash to bring it up to 75 °C, and then thoroughly stirred and rested for an hour to continue conversion. Then a small amount of wort, about one tenth of the whole volume, is drawn off and used to boil the hops for about 30 minutes, then the rest of the wort is drawn off, added to the wort and hops, and boiled even longer (the author doesn’t specify how long, though).

Both beers brewed after the Augsburg and the Franconian method are sparged, but the resulting second runnings aren’t added to the first runnings, but rather made into a small beer called “Hansle” (if you’ve read my book, other sources also call this “Heinzele”).
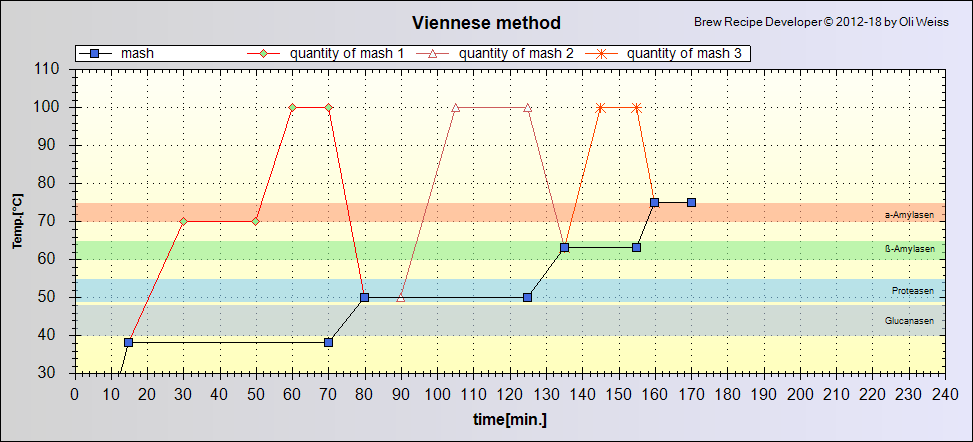
Viennese Method

According to the author, this method may actually be used to produce more beer than with the Munich method, as it has been in use not only in Austria and Germany, but also in France, Norway, Russia, as well as breweries in North and South America. The method is described in very specific numbers:

To produce 100 liters of beer, 20 to 22 kg of malt are used. The total water amount is 200 liters, split up into the mash water (125 to 166 liters) and the sparge water (34 to 75 liters).

To malt is doughed in with 2/3 of the cold mash water, while 1/3 of the mash water is brought to a boil. It is stirred until it is completely smooth, and only then the boiling water is added to bring the mash to a temperature of 36 to 38 °C. The rest of the mash is done in a triple decoction fashion, with two thick decoctions and a thin decoction.

The first decoction is heated up, but not immediately brought to a boil: instead, it is rested at 70 to 75 °C for 10 to 35 minutes. After that, it is quickly brought to a boil, and boiled for 5 to 15 minutes. The boiling mash is then mixed back while thoroughly stirring to bring it to a temperature of 45 to 50 °C. After a rest of a few minutes, another third of the mash, again a thick mash, is drawn off and boiled for 20 to 50 minutes. It is then again mixed back. Unfortunately, the author doesn’t mention the expected temperature, but we can guess it to be in the range of 60 to 65 °C. For the final decoction, a larger amount of the whole mash, 40 to 50 %, is drawn off and brought to a boil so that the protein coagulates and the hot break settles. It is then mixed back into the main mash which should then have a temperature of about 75 °C. After some more stirring, the mash process is considered finished.

The mash is then lautered and sparged, and the wort is boiled with the hops. The stronger the beer, the more hops are used. Unfortunately, it doesn’t provide any specific hopping rates. Original gravities are mentioned, though: lager beers are generally at around 13 °P, while low-gravity draught beers are at 10 °P.

Bohemian Method

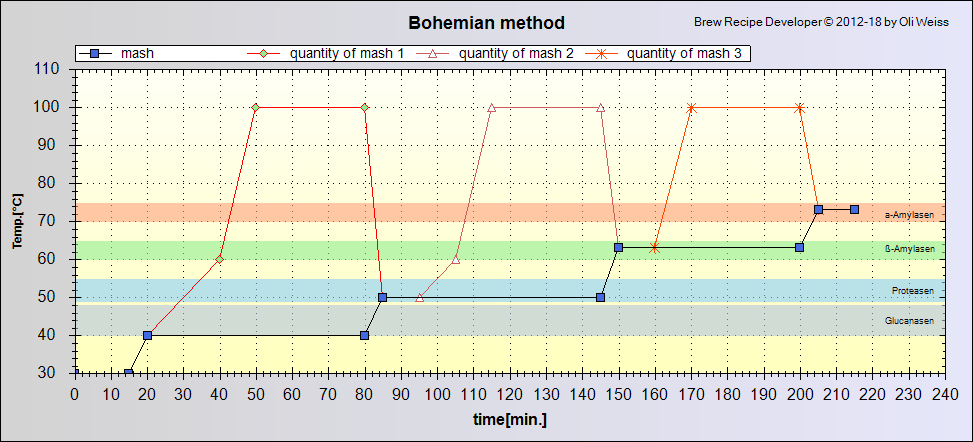
The Bohemian beers at that time are characterized as less malty, but rather more hop-aromatic. With every 100 kg of malt, 700 liters of water were used: 562 liters in the mash, 188 for sparging. 435 liters of water are used for doughing in at a temperature of 40 °C in winter, or 30 °C in summer. After doughing in is completed, 108 liters of boiling water are added to raise temperature. After a few minutes of rest, about one quarter of the thick mash are removed and very slowly heated up to 55 to 60 °C so that the enzymes can convert starches into sugar. After that, the decoction is brought to a boil, while the hot break gets skimmed. After 30 minutes of mashing, it is mixed back into the main mash, and stirred thoroughly to ensure a consistent temperature throughout the mash. After that, a second and third decoction are drawn and conducted exactly like the first thick decoction. After the third decoction has been mixed back, the overall temperature of the mash should be at 70 to 75 °C, and the mash is rested.

Wort is then drawn off until it is clear. The turbid part of the wort is boiled together with about 19 liters of water for a few minutes, and poured back into the mash. The mash is then moved to the lauter tan, and lautered and sparged with the sparge water that was set aside. The resulting wort is boiled with relatively large amounts of hops. Some of the hops are kept back and only added at the end of the boil to increase the amount of volatile hop aromas. This is what the author considered to be very specific for Bohemian beers and what gives them their typical hoppy aroma and flavour.

Discussion

While I’ve been working with lots of different sources when I was writing my book about historic German and Austrian beers, finding such a detailed description and comparison of various types of decoction mashing was quite refreshing. The Old Bavarian method is closest to what I’ve seen in plenty of other sources. I would describe it as the most classic method, pretty much fully based on manual labour, and done with an approach that employs volume measurements so that when done properly, no temperature measurements would be necessary. The ratio of malt to water is crazy high, though. For decoction brewing, today’s literature recommends ratios of 1:4 to 1:5. The text is not totally clear in all details, and might mean the total amount of water needed for the brew, i.e. including sparge water.

The Augsburg method, “Satz brauen” is truly odd. I’ve actually seen several different ways of how this is done, and the description as summarized above is actually the clearest one I’ve seen so far. It is possible to see why this method works and how it gets all starch converted, but it seems horribly inefficient, even in comparison to classic decoction mashing.

The Franconian method is closest to modern brewing. Any lower temperatures are skipped, and the main temperature is right at saccharification temperature. Other descriptions of the method that I’ve read don’t even employ a final thin decoction, but this might probably just be a local historic Bamberg variation.

The Viennese method on the other hand can be considered to be very modern: the specific method of resting the first decoction at about 70 °C for a while to let starches convert before the diastatic power is destroyed in the boil is a technique that even modern literature recommends, e.g. Narziß, though his recommended temperature is closer to 65 °C. And that’s what differentiates it from the classic Bavarian method: while it follows the same general pattern, it is more intricate, more detailed, more informed. It is built on top of the information that enzymes (though the book only says “diastase” without knowing what exactly enzymes are) break down starches to sugars at certain temperatures, and in the Viennese method, this is used to maximize fermentability of the wort. It is what I would call a modern method, this modernity would also be a good explanation for its success that is indicated by the author’s comment how internationally widespread the Viennese method has become.

The Bohemian method does seem a little bit more rustic, and differentiates itself by only using thick decoctions. It already builds upon the knowledge that starch conversion happens at certain temperatures, and leverages this knowledge to facilitate conversion when heating up individual decoctions. The specific mention of certain amounts of water does show that this has been thought through more and indicates that it closely follows a tried and tested recipe.

While not strictly related to the mash, the author discusses what distinguished Bohemian beers from other lager beers: the pale colour as well as the unique hopping method. I am not surprised that the author points out the use of late hopping techniques to introduce a brighter and more intense hop aroma. While we nowadays know that it’s the way of producing hop-aromatic beers, it is not a technique commonly seen in old brewing literature, where hops were only added for their preservative qualities as well as their bitterness.

All in all, this historic comparison of various mashing techniques from Bavaria, Bohemia and Austria was a great find. It gives a good insight into the shift from brewing as a craft involving manual labour (Old Bavarian method) to the industrialization of beer production supported by automation (New Munich method) and scientific methods (Viennese method). It also gives a good explanation what made Bohemian beer so unique and special in the late 19th century, which was also a reason why pale lager beers became the most widespread and successful type of beer in the world. And last but not least, it is also a good lesson for homebrewers how the decoction mashing process can be varied, in a form that’s even usable on a relatively small scale.

If you’re a homebrewer and you’ve never done a decoction: try it out. It may seem scary, but after brewing several beers with decoction mashing, I can safely say that it’s really hard to screw things up if you just follow the principle of doughing in, heating it up to about 40 °C, and then repeatedly taking out roughly a third of the mash, boiling it, and mixing it back. The mash goes through saccharification temperatures multiple times, and especially with enzyme-rich, “hot” malt that we have available nowadays, most of the conversion happens fast. I am a proponent of decoction mashing, because conceptually, it is really hard to screw up.

A little story about two historic mashing processes that didn’t quite work out

Let me tell you a little story about two historic mash processes that I discovered by pure chance, and how neither of them quite worked out. But there’s still stuff we can learn from them.

During some beer-related research, I stumbled upon a brewing book I hadn’t seen before, “Handbuch für den Amerikanischen Brauer und Mälzer” (“manual for the American brewer and maltster”), written by Ernst Hantke and published in 1897. This was odd, I thought, because it specifically referred to American brewing, and yet was published in German. Hantke was born in Silesia, and grew up in Germany. He studied chemistry, and landed a position as assistant of Dr. Delbrück at the “Versuchs- und Lehranstalt für Brauerei”, better known as VLB Berlin. In 1893, he emigrated to the United States, where he first worked as instructor at the American Brewing Company, and later accepted a job at the Valentin Blatz Brewing Company in Milwaukee, Wisconsin.

Milwaukee at that time was the epicenter of German-American brewing, four of the largest American breweries at that time were based there, Miller, Pabst, Schlitz, and Blatz, all of them founded by German immigrants to the US at some point during the 19th century. Among American brewers, Hantke’s book was well-received, his epitaph in “Letters on Brewing” says:

At the brewmasters’ convention in Pittsburgh in 1896, when the first few pages were offered for inspection, the whole assembly of brewmasters welcomed the book so heartilythat Dr. Ernst Hantke was encouraged to renewed activity. In 1897 at the brewmasters’ convention in Detroit, the first volume, comprising 668 pages, was ready for distribution in book form and 2 years later the second volume of 824 pages completed.

So Hantke was in the unique position to both have researched German brewing in scientific detail, but at the same time also witnessed large-scale beer production in the United States at the heart of American lager brewing. He discussed general differences, like the German preference of all-malt decoction mashing and the American preference of using adjuncts (unmalted grains) and infusion mashing. He even brought a specific rationalization for why this difference makes sense: decoction beers are more nutritious, but under the impression of the hot American climate during the summer, and the American habit of eating meat three times a day, it is easy to realize that customers will prefer a refreshing, pleasant-tasting, and fizzy drink to a nutritious one.

Also from a purely technological point he defended infusion mashing: he described American malts to be generally of high quality and usually kilned at low temperatures, so the available diastatic power was enough to reach the same level of extraction and efficiency as a decoction mash, but resulting in a more fermentable wort and a quicker process.

When I went through the book, I was especially excited to see descriptions of two mashing processes, one described as the “Wiener Maischverfahren”, the Viennese mashing process (essentially a 3 decoction mash with two thick and one thin decoction) as done by Schöneberger Schlossbrauerei from Berlin, while the other mash processes is the specific adjunct mashing process as practiced by Pabst. So not only contains this book general process descriptions of how German and American brewers were mashing, it even references the specific breweries that employed the respective techniques.

The descriptions were detailed enough to reconstruct the whole process and convert it to typical homebrewing sizes. The Viennese mashing process was first. The amount of beer produced 140 hectoliters, at an OG of 12° Balling (about the same as 12° Plato, OG 1.048). The amount of malt used was 2500 kg. So, to start scaling the whole recipe down to the typical homebrewer size of 20 liters, let’s see by which factor we need to scale it down. 140 hl / 0.2 hl = 700. Alright, then let’s convert the grist: 2500 kg / 700 = 3.571 kg. Wait… a 12° beer from just 3.571 kg of malt? That won’t work out, especially since the brewhouse efficiency is documented as 65.19 %. Something must have gone wrong there when the author transcribed the recipe or something. Nevermind, on to the second recipe, the Pabst adjunct mashing process.

In this process, 300 barrels of beer were produced from 10000 pounds of malt and 6000 pounds of grits. The grits are mashed in, boiled for 15 minutes, and then added to the main (malt) mash to raise the temperature to saccharification temperature. While we don’t know the exact OG of the wort that Pabst produced, another, very similar process mentioned in the paragraph right after the Pabst process, we can assume an OG of around 13.1° Balling (about the same in Plato, 1.053).

So, again for scaling: 300 barrels are 300 bbl * 117 l = 35100 liter. To scale down to 20 liters, we therefore need to divide by 35100 / 20 = 1755. 10000 pounds are 4536 kg, while 6000 pounds are 2721 kg, which means the grist consisted of 4536 kg / 1755 = 2.58 kg malt and 2721 kg / 1755 = 1.55 kg grits, in total a grist of 4.13 kg. To produce a 13° wort from just that amount of malt, you’d need to reach a high amount of extraction, especially so for home brewers, which I don’t think would be that easily doable with just an infusion mash. While slightly more believable than the numbers of the previous recipe, I’m still not quite sure whether this is 100 % correct or whether the author made a mistake of some sorts. Or maybe I made a mistake? I assumed 1 beer barrel to contain 31 gallons as is standard in the US (normally, 1 bbl contains 36 gallons), and I converted using US gallons (3.78541 liter), so my calculations should be sound.

Despite all these inconsistencies, we still learn valuable details: the grist of a late 19th century American lager as brewed by Pabst consisted of 62.5 % malt, 37.5 % corn grits, was mashed using an infusion mash with a separate adjunct mash/boil to gelatinize the grits, and the wort produced, if we can assume that most breweries at the time produced beer of about the same strength, was probably at an original gravity of about 13 °Balling (1.053). That’s a good start to formulate a recipe at least inspired by a lager of that era.

The mash process is also quite specific: dough in the grits into a liquor of 50 °C, the resulting mash should then have a temperature of 47.5 °C. Rest for 30 minutes, then heat up to 67.5 °C, rest for 20 minutes, then heat up to 75 °C over the course of 15 minutes. Then bring to a boil, and boil the adjunct mash for about 15 minutes. In the meanwhile, the malt is doughed in at a temperature of 45 to 47.5 °C. The adjunct mash is then added in two steps with 5 to 10 minutes inbetween, to raise the main mash temperature to 70 °C. From there on, the mash needs to convert the starches to sugar. When the mash is fully converted, the mash temperature is raised to 72.5 °C by adding more hot liquor, which concludes the mash. The first runnings of this mash should have an OG of 19° Balling (about 1.079). While not a complete recipe, with some additional calculation a homebrewer could work with that.

Compared to the adjunct infusion mash, the Viennese mash is more intricate: the 2500 kg of malt are doughed in so that the resulting mash is 92 hectoliters at a temperature of 17.5 °C. Then, 32 hectoliters of boiling water are slowly mixed in to bring the overall temperature of the mash to 37.5 °C. The first thick decoction of 30 hectoliters is then drawn and boiled for 30 minutes down to 26 hectoliters, then mixed back to the main mash to raise the temperature to 50 °C.

The next thick decoction, 40 hectoliters, is then drawn off, and boiled for 35 minutes down to 36 hectoliters. After mixing it back, the temperature of the main mash is at 61.25 °C. Then, the final decoction, 53 hectoliters of thin mash, are drawn off, and boiled for 35 minutes down to 49 hectoliters. After mixing it back, the main mash should be at a temperature of 75 °C, and the size of the mash in the mash tun should be 112 hectoliters. The whole process takes 4.75 hours.

After lautering and sparging, 152 hectoliters of wort are collected, which is boiled for 2.5 hours to get 140 hectoliters of wort at an OG of 12° Balling. The total work time for a single batch is described as 12.25 hours, surely a long brew day in Schöneberg, while Hantke mentions that brewing using the infusion method takes 5 to 7 hours, and not only saves time, but also lots of fuel that is otherwise required to boil the various decoctions.

So, what can we learn from this? First of all, always scrutinize historic recipes if it’s possible to check them for consistency (in this particular instance, we knew amounts of beer, grist, and OG). Second, we can still get a whole lot of information out of such historic records. We learned about the strength of American lager beer at the end of the 19th century, we learned about the grist composition in one particular instance, i.e. how Pabst used to brew their beer, and we even learned the specific method how Pabst used to conduct their mashes.

In my opinion, that is a whole lot to start developing a lager recipe: 13 °P, a ratio of malt and grits of 62.5/37.5, and mashed according to the infusion method described above. Hantke lists using about 1 pound of hops per barrel of beer for beers at 13° Balling. That’s a hopping rate of about 3.9 g per liter, which I find a bit too high, especially when using a classic American hop variety, such as Cluster. But then, with Cluster you should be able to achieve a bitterness and hop character that probably comes quite close to what American lager beer over a 100 years ago must have tasted like.

If you want to learn more about German-American brewing in the late 19th century (provided you can read German), here’s a link to the “Handbuch für den Amerikanischen Brauer und Mälzer“. For even more insight about 50 years later, there’s also the (English-language) “The Practical Brewer“, authored and edited in 1946 by the master brewers of Griesedick Bros. Brewery and Anheuser-Busch Brewery, both of St. Louis, Missouri. Even there, the great influence of Germans on American lager brewing is very noticeable, in particular in vocabulary.

19th Century Brewing Methods in Germany and Austria

Only the other day, I stumbled upon a book called “The Art of Brewing“, written by one David Booth, published in 1834. It has a whole section of brewing in foreign countries, discussing differences in brewing between Munich, Prague, Vienna, and other cities. The basis for this section is credited to two unnamed guys, can you guess who?

For the greater portion of ” the Brewing in Foreign Countries,” I am indebted to the manuscript and oral communications of two German Brewers (from Vienna and Munich), who have been, and now are, visiting the principal towns of Europe, for the laudable purpose of acquiring information concerning their business.

Yep, that sounds very much like Gregor Sedlmayr and Anton Dreher.

I also found another book, “Vollständige Braukunde” by Johann C. Leuchs,  that discusses the brewing methods of various German cities. In this article, I will try to summarize and discuss different German brewing techniques from the 19th century, and how they would be seen from a modern (home)brewer’s point of view.

Munich

For the mash, a mash tun made out of copper, with a false bottom, and a second, smaller copper, were used. The second copper was used for boiling the mash. The standard recipe is described to be 8 quarters of malt and 60 pounds of best Bavarian or Bohemian hops to produce 27 barrels of keeping beer. Calculating what the outcome of that would be, that would be a beer with about 6 to 7.5 % ABV, with probably 35 to 50 IBU. It does mention the Munich beer as keeping beer, meaning it was matured, or lagered, for a relatively long time.

The coarsely ground malt is doughed in, while the small copper is used to bring liquor to a boil. The boiling liquor is then added to the mash, to result in a 40 °C mash. Then a decoction is drawn, and brought to a boil. The author mentions a thick froth that is beaten down back into the mash. I assume this is hot break, and nowadays you would rather skim the scum instead of beating it back into the mash.

The first boil takes about an hour, where it gets a darker colour, until it is put back into the mash, to raise the temperature to 55 °C. Immediately, another decoction is drawn, but only boiled for 30 minutes, and then put back, with a resulting temperature of 67 °C. A third, thin decoction is then drawn, both taken from the top and taken from the tap (the mash tun has a false bottom, after all). Then it is boiled for 15 minutes, and put back, to reach a temperature of 75 °C. That whole procedure takes about 5 hours.

After that, the wort is drawn off. Hops are added while the first runnings are still drawn off, so this constitutes a first wort hopping. The overall boil lasts 2.5 to 3 hours. Fermentation is bottom-fermenting, as expected. What’s interesting is that after primary fermentation, the young beer is drawn into casks. A batch is spread out over lots of casks, though, so it takes about ten batches to properly fill all the casks. I presume this is to blend all the batches and to end up with a very consistent product over all casks even when the individual batches differ. Lagering period in the cellar is mentioned as lasting eight to ten months. That is indeed a keeping beer.

Beer brewed for the winter differs from this, as less hops are used, more wort is drawn off, and it’s boiled for a shorter period of time. There is very little maturation, and secondary fermentation for carbonation is initiated with Kräusen, and essentially happens in the publican’s cellar. This very much sounds like a running beer. Comparing with modern drinking habits, this is very counter-intuitive, as you’d expect the lighter beer to be brewed for the summer as a refresher, and the bigger beer to be made as a warming, boozy drink.

Augsburg

Apparently, the brewing methods in Augsburg were quite different from the rest of Bavaria. It starts with the malt: it is ground finely. The boiled hops of the previous batch are put on the false bottom prior to putting malt and then cold liquor over it. This is left for six hours. Boiling liquor is then added, and mashed for half an hour, and then more hot liquor is added, to bring it to 60 °C. This is then left for two hours. Sweet wort is then drawn off and put into the cooler. More hot liquor is added, and mashed for half an hour, with the resulting temperature being 67 °C. Then “all the goods” (I presume this means all hard matter) are put into the copper with hot liquor, and boiled for 45 minutes, then put back into the thin mash. The resulting mash is then at 86 °C. After some time, the cooled wort is put into the copper, the wort from the mash is also drawn off, hops are added, and the whole thing is boiled for two hours.

Fermentation is bottom-fermenting, and the beer is ready after about 2 months of maturation. Usually though, it is kept in large vats for a year to 1.5 years.

According to “Vollständige Braukunde”, beer brewed like that requires more cleanliness than the Munich approach, but has a higher yield and produces a milder beer.

Overall, a rather weird method in today’s standards. It seems like an infusion mash in the beginning, but with a final decoction, which would extract complex carbon hydrates, but leave the mash at temperatures where all amylases would have already been denatured, and no enzymes would be left to convert the starches into more simple sugars. Did the Augsburgers like their Blausud? (a Blausud is when a wort sample, mixed with an iodine solution, turns dark blue: it is an indicator that there’s still unconverted starches in the wort)

Prague

Prague’s brewing methods are described as similar to Munich, but with a fermentation “of the opposite kind”, which I assume means that in the 1830’s, Prague was still brewing with top-fermenting yeast.

Dough in starts at 46 to 50 °C, with an initial rest of nearly an hour. During that mash, more hot water is added to reach 59 to 63 °C. Then a decoction is drawn, brought to a brief boil, and then put back to get up to 67 to 68 °C. Then another rest of an hour follows. Wort is then run off, a Vorlauf if you will, with the express purpose to get rid of any grains underneath the false bottom. This wort is brought to a boil, and put back, to bring the temperature of the mash to about 84 °C. It is also emphasized that the grains must not be disturbed. Then a small portion of the wort drawn before is brought to a boil together with the hops, and the hops are taken out after 45 minutes. In total, the wort seems to get drawn off in batches and boiled, with the hops getting reused. A sparge is done, and the runnings are boiled with the hops from the previous boils.

Fermentation is done at 20 to 22 °C, so obviously top-fermenting. Maturation then happens in ice-cooled vaults for four to six weeks, and is served directly out of that cold environment. Yep, ice-cold beer.

Anyway, what we can see here is that the Munich style of mashing is a triple decoction, while Prague employed a double decoction.

Vienna

The crushed malt is doughed in with cold water, and mashed for two to four hours. Then cold wort is drawn off, and is brought to a boil together with liquor, boiling for 45 minutes. The froth on the top is skimmed off. It is then put back onto the malt, with a resulting temperature of 40 °C. Now this seems quite odd to me, as it would mean that a lot of the enzymes in the wort would be denatured quite early on.

Then something truly odd is done: wort is drawn off, and pumped back onto the mash. This is done for over an hour. A certain amount is kept in the copper, and again brought to a boil, but as soon as it starts boiling, it is added back to the rest of the mash, to increase temperature to 57 °C. Then more wort is drawn into the copper, again brought to a boil, boiled for 30 minutes, then put back into the mash. This is now left for 30 minutes at 72 °C. And then more wort is drawn off, again brought to a boil of 45 minutes, put back into the wort, and left for another hour at 82 °C.

Then wort is drawn off once more, and hops are added. When all the wort has been drawn off, the grains are loosened, and water of 56 °C is sprinkled onto it. The wort is boiled for 75 minutes, and some of it is put into the cooler. Then the second runnings are drawn into the copper, and boiled for another 90 minutes.

Then the wort is cooled to about 30 °C, and yeast is added. That’s a crazy pitching temperature. Fermentation is vigorous, and the young beer that is thrown out during the fermentation is collected and fermented in a separate vessel. This sound vaguely like the idea of a Burton Union, although with a separate vessel instead of recirculation. Shortly after fermentation has finished and the yeast has settled, casks of the young beer are sent out to the publicans. This all happens within 3 days.

So, in total, quite a strange process. Kinda like a decoction, except only thin decoctions are drawn. I wonder what prevented this from resulting in a Blausud, as well.

Berlin

This gets interesting now. Berliner Weisse. “The Art of Brewing” describes it as a beer made from 5 parts of wheat malt and 1 part of barley malt. That’s quite different from the 2:1 or 1:1 recipes that are listed in other old publications. “Vollständige Braukunde” mentions 20 parts of barley malt, 10 parts of wheat malt, and 2 parts of oat malt.

The finely ground malt is doughed in, and hot liquor is added to bring the temperature up 52 °C. This is left for an hour. Then wort is drawn off, and boiled with hops for 15 minutes. A thin decoction is drawn to interrupt the boil, and when this has reached 93 °C, it is put back into the mash, and left for 30 minutes, with a resulting temperature of 67 °C. Then another thin decoction is drawn, heated up to 96 °C, then both the mash and the decoction are put into the “tap-tun”, what sounds like a lautering vessel with a false bottom which is covered with straw (some sources say straw used in lautering was previously boiled in water). The resulting temperature in this tun is 75 °C. The wort is then drawn off, very slowly, though, and hot liquor is used for sparging. The overall lauter and sparge takes 7 hours, to produce a very clear wort. The wort is then put into the fermenting vessel, where yeast is added. Fermentation quickly begins, and the beer gets already shipped out to the publicans at this early stage.

In “Art of Brewing”, the author mentions that brewers thus have no yeast, and must buy it back from the publicans. To keep their yeast strains reasonably clean, they preferably buy from publicans that deal with other breweries than their own. The publicans also take care of bottling and storing the beer until it’s drinkable, which is usually after 14 days.

In total, this is quite the interesting process, as it does a kind of decoction, with the hop boil during the mash, and no further boil. Berliner Weisse is often described as a no-boil recipe, and people often ask themselves how the hops are added to it if there is no boil: directly during the mash. This way, the amount of isomerization of the alpha acids is easily to control, which is usually not the case if you added hops to a thicker mash that would undergo several decoctions.

Summary

In this article, I tried to summarize descriptions of different brewing techniques in German and Austrian cities at that time, in particular Munich, Augsburg, Prague, Vienna, and Berlin. It is interesting to see how the approaches completely differ, in particular the amount of decoctions that are drawn, what kind of decoctions are drawn, what is boiled for how long and in what order, and what temperatures are kept. With today’s knowledge and understanding of brewing and the microbiology behind it, it is fascinating to see what would be considered good practice nowadays, and what wouldn’t. The Munich triple decoction is a well-researched and well-documented method, as is the Prague double decoction. You would find descriptions of these in most modern brewing literature. The other methods, not so much. There, we find temperatures that would extract more tannins, or early thin decoctions that would denature lots of crucial enzymes early on in the brewing process. I seriously wonder how these brews went fine, and whether they produced Blausude.

DMS and Boil Time

After writing about the sources of DMS in beer a few days ago, I stumbled upon another quite interesting paper from 1978 that discusses the influence of boil time on the amount of DMS in beer, titled “Control of the Dimethylsulphide Content of Beer by Regulation of the Copper Boil”.

In this paper, the authors put together two different lager malt blends. LMB 1 was designed in such a way that it was kilned at 65 °C, so that it would only contain inactive DMS precursor (see the previous article about active and inactive DMS precursors). LMB 2 on the other hand for kilned at 70 °C and later at 90 °C, so that it would contain substantional amounts of active DMS precursor. With both malt blends, worts of OG 1.037 (9.25 °P) were produced using a single-step infusion mash at 65 °C. The worts were boiled for different times (from 15 minutes up to 2 hours). Each of the worts were split, and fermented with different yeast strains, NCYC 240 and NCYC 1324. The two different yeast strains differ in the amount of DMS they produce: NCYC 240 produces a high amount, while NCYC 1324 produces a low amount.

What was noticeable in the results from the different boil times alone is that there a strong correlation of boil time with decreased amounts of DMS and DMS precursor in the worts. Consistently, LMB 1 had lower amounts of DMS and DMS precursor compared to LMB 2.

When the authors looked at DMS levels after fermentation, the results were quite clear, as well: a longer boil not only brings down the amount of DMS and DMS precursor in the wort, it also consistently reduces the amount of DMS in the resulting beer.

Influence of Boil Time on DMS Levels in Wort and Beer

The paper concludes that the DMS content in beer can be controlled almost impossible from other influencing factors through the right boil length and temperature. There is one exception though: if the DMS comes from another source than DMS precursor, a longer boil doesn’t reduce besides the normal evaporation.

Just like I hypothesized in my previous article, I will mention this again: I think that the literature is quite clear in that the wort boil has a large influence on DMS levels in beer, just like the specific metabolism of the yeast strain has a large influence, and that in the Brülosophy exbeeriment, the experimenters were just “lucky” in getting the right malt with only low levels of DMS and active DMS precursors, and a yeast strain with only low DMS production.

Optimizing a Hefeweizen Mash for Esters and Phenols

A few days ago, I had the idea that I wanted to brew a classic Hefeweizen. In my few years of homebrewing, I had actualy only ever done a “proper” Hefeweizen once, and it was the “Almtaler Hefeweisse” kit from Hopfen&Malz. I wasn’t overly impressed by the specific beer, it seemed a bit too watery for my taste. But then, that may have been purely because it was my third beer that I ever brewed. After that, I brewed two more Hefeweizen, but both with a twist, i.e. a heavy late aroma hopping, followed by some dry-hopping with Nelson Sauvin. That beer was a success, but it’s definitely not your classic Hefeweizen.

A Bavarian Hefeweizen has some specific properties: it’s brewed from a mix of barley malt and wheat malt, with the wheat being at least 50% of the grist. Some commercial examples even contain as much as 70% wheat malt. The beer is cloudy, both from proteins from the wheat malt and yeast in suspension, and while pale, it’s usually a tad darker than your German pale lager, sometimes even going towards a reddish hue. Hop bitterness is very low, with no hop aroma. Alcohol-wise, the typical commercial examples usually have 4.8 to 5.5% ABV. The yeast strains used for that style are top-fermenting. Historically, Hefeweizen did not conform to the Bavarian Purity Law (Reinheitsgebot) because it contains wheat malt, while the Reinheitsgebot only allows barley malt. Special permits were instead issued to those who held the privilege to brew with wheat.

Because I wanted to brew a Hefeweizen on a rather short notice, I went to Bierlieb and got some ingredients. Their choice in ingredients is alright but not great, but definitely enough for quite a few German beer styles, your odd IPA or Belgian-style beer. Unfortunately, they only offer dry yeasts, so I had to get WB-06. Now, the thing is that I’ve heard quite a few bad things about WB-06, namely that it’s a rather bland yeast that produces only tiny amounts of the typical phenolic and ester notes of a proper Hefeweizen. My previous experience with dry yeasts in general and specifically Fermentis dry yeast has been rather good so far (S-04 is my standard for most British styles, US-05 is the Chico strain and so probably the standard for almost everyone’s American styles, and Saflager W-34/70 and S-23 have worked for me in the past, too), so I wanted to give them a try nevertheless.

Just to be sure that I would definitely get enough phenolic (clove) and ester (banana) notes in my Hefeweizen, I was looking for a way to optimize my wort production to provide the yeast with as much of the precursors as possible.

For the clove notes, that’s relatively easy. The phenolic clove notes in Hefeweizen come from the specific yeast strains metabolizing free ferulic acid to 4-vinyl guaiacol. Ferulic acid is in the malt itself, but it needs to be freed and available in the wort. That is usually done through a ferulic acid rest, at about 45 °C.

The banana notes on the other hand are esters, iso-amyl acetate and ethyl acetate, and their production by the yeast directly correlates to the amount of glucose in the wort. So obviously, I’d need to do a mash in a way to increase the amount of glucose. Fortunately, there is a pretty cool method for that, the Herrmann method, or Herrmann-Verfahren in German. It is named after Markus Herrmann who wrote his doctoral thesis at Weihenstephan about the formation and influence of flavouring substances in wheat beer about a decade ago (sorry, German only!).

The principle behind the Herrmann-Verfahren is relatively easy: malt contains a number of enzymes which manipulate starches and complex sugars at specific temperatures. The most important ones are alpha- and beta-amylase that do most of the work. But there is another enzyme, maltase, which can break down maltose into glucose. Unfortunately, maltase works at about 45 °C, and is quickly denatured at higher temperatures. So Herrmann designed a mash schedule that first produces a good amount of maltose through a straightforward Hochkurz infusion mash, with 60% of the grist. Then, a second mash with the remaining 40% of the grist and cold water is done, which is then added to the first mash, bringing it down to 45 °C. That way, the maltase enzymes from the second mash can munch on the maltose produced by the first mash and create more glucose. After that mash, a second dextrinization rest is conducted, followed by mash-out.

The whole process is illustrated here:

Herrmann-Verfahren

That way, you end up with a wort with a lot higher amount of glucose, eventually leading to more esters after fermentation with the right yeast strain. Coincidentally, the 45 °C of the maltase rest is the same temperature that is also necessary for the ferulic acid rest.

The recipe that I came up with for my Hefeweizen looks like this:

Grist:

  • 66.6% Pale Wheat malt
  • 18.5% Pilsner malt
  • 9.3% Munich malt (dark)
  • 5.6% CaraMunich II

Hops:

  • 0.5 g/l Hallertauer Tradition (7% AA) first wort hopping
  • 0.25 g/l Hallertauer Mittelfrüh (3% AA) @ 20 min

60 minute boil. 10 IBU. Mash as described above. WB-06 yeast. OG 13.25 °P. For carbonation, I’m using about 7.5% of the wort as Speise.

For fermentation itself, I’m chilling the wort down to about 17 °C, then I’ll pitch the yeast, and will let the temperature freely rise to ambient temperature (about 23 °C in my flat at the moment). Fermentis recommends for the WB-06 yeast to keep a temperature below 22 °C for clove flavors and above 23 °C for banana flavors. Given that my wort provides the yeast with enough glucose and ferulic acid to actually produce either flavors above the perception threshold, I should be fine with that fermentation schedule to achieve a hopefully balanced Hefeweizen with all the right aromas and flavors and none of the wrong ones.

As soon as the beer is finished, I’ll report back about the results.