Tag Archives: enzymes

Why a Triple Decoction Mash Can Never Fail

I’m currently working on a new project, so as part of that, I’ve been reading quite a few historic descriptions of decoction mashing, in particular triple decoction which historic literature generally describes as the standard mash schedule in Bavaria, Bohemia and Austria around the 1870’s-1880’s.

When I played a bit with calculating the right mash volumes and the mash temperatures, I stumbled upon an interesting property of standard triple decoction: you can’t get it wrong. You actually have to actively try and sabotage it for it to fail.

This is a really cool thing because triple decoction sounds so ancient and complicated and easy to do wrong, and I think that scares a lot of people who then shy away from trying it out, but if you follow a few simple principles, you can’t go wrong at all.

These principles are:

  • always pull 1/3 of your total mash volume as decoction
  • pull the first and second decoction thick (i.e. mostly malt with little liquid), and the third decoction thin (i.e. mostly liquid)
  • bring each decoction to a boil, boil for a bit, then mix back into main mash
  • make sure you measure your volumes exactly, work quickly when mixing back, but also mix thoroughly
  • when doughing in, give the enzymes some time to get dissolved before starting to pull your first decoction

From a historic point of view, triple decoction was a reliable method to guide your mash through a number of particular ranges of rest temperatures to facilitate the activity of specific enzymes to convert long proteins into shorter protein chains and to convert starch into simple sugar molecules and shorter dextrin chains to both achieve a fermentable wort and a good mouthfeel, without requiring a thermometer.

And when you apply some maths, and draw a pretty graph, it really shows that all you need is the ability to vaguely judge your initial mash temperature to be between somewhere slightly above room temperature and slightly below tepid, and everything falls right into place, provided you follow the principles above.

The general equation to calculate your decoction volume is:

decoction volume = total mash volume * (target temperature – start temperature ) / ( boil temperature – start temperature)

If we assume the total mash volume to be 1, and our decoction volume to be 1/3, we can rewrite this to

target temperature = start temperature + 1/3 * (boil temperature – start temperature )

Based on this, we can easily calculate whole temperature series if all we do is repeatedly pull decoctions that are 1/3 of the whole mash volume, bring them to a boil, and mix them back.

I’ve done this in a spreadsheet, and put this into a nice temperature/time chart to indicate the time schedule your mash steps would follow. In total, I’ve done this with four different initial temperatures: 20, 25, 30 and 35 °C. This is a rather wide temperature range, but it’s also one where most people could easily and correctly judge whether a liquid is within that temperature range just by feeling with their finger or elbow. To keep the chart readable, I’ve only added the main mash temperature, and left out the temperature curves of the decoctions. To account for cooling during mixing back, especially so on a homebrew scale, I assumed a boiling temperature of 95 °C instead of 100 °C.

Triple Decoction Mash Temperatures

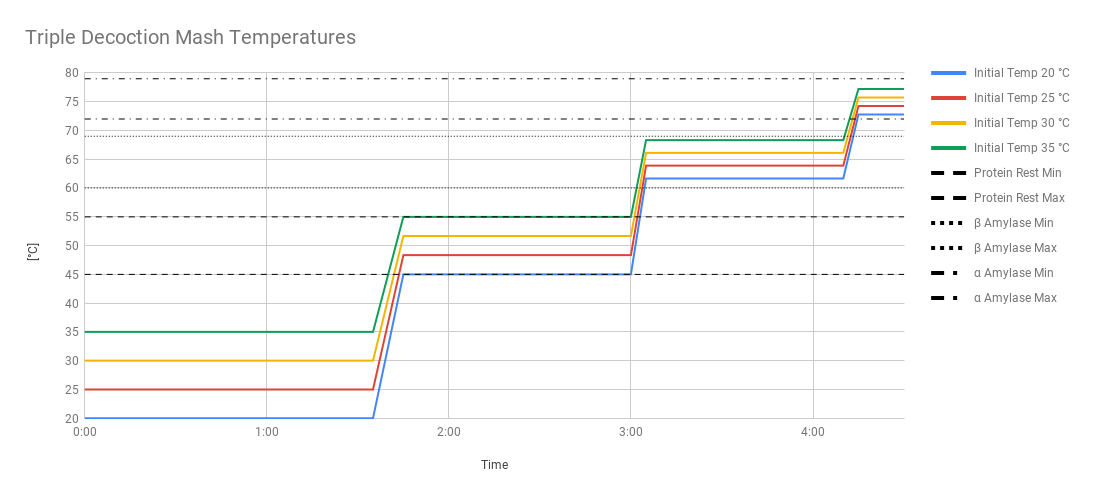
In addition, I’ve marked the temperature ranges in which you reasonably want to keep your mash to do a protein rest, as well as to give the alpha and beta amylases good conditions to do their work.

When you now look at the chart, it is very noticeable that at all stages (protein rest, maltose rest, saccharification rest/mash-out), all our target temperatures fall within the desired temperature ranges. The further we go, the more all the temperature curves converge towards a narrower and narrower temperature range, even though we started with a very wide one. This makes it very hard to screw up, even if you e.g. slightly miss your target temperature after your first decoction: you will still be well within the desired temperature range.

In addition to that, when you bring up your decoctions, in particular the first one, to a boil, they go through these temperature ranges as well. Some modern mash schedules recommend doing at least a saccharification rest to optimally use the enzymes that will later get destroyed, so you can have an infusion step mash within your decoction. Even if you don’t do it, unless you heat up very quickly, your decoction will at least partially convert when you heat it up.

And this is why your triple decoction mash can never fail: when bringing your decoctions to a boil, they will partially, if not mostly, convert, and then release more starch during the boil, which will then be fully converted in the main mash. There are two decoctions where the enzymes get into the right temperature range to convert starch into sugar, and there are two rest steps where the enzymes have even more time to convert more starch into sugar. Your whole mash goes through the right temperature so many times, it will eventually be fully converted. And to get into these right temperature ranges, all you need to do is follow a few simple principles. And if you want, you could even do this totally without a thermometer.

For most modern malts, triple decoction is possibly a bit to harsh, in particular when it comes to the extended protein rest which could potentially be very damaging to foam stability. For this, you can also employ an enhanced double decoction, in which you start at the same temperature as a triple decoction, but pull double the volume for the first decoction, and do a step mash of your first decoction before boiling it. That way you keep the intense treatment of your malt, but can keep the time within the protein rest range to an absolute minimum.

The Theory of Brewing Reinheitsgebot-Compliant Brut IPA

Watch out, NEIPA, there’s a new fad in town: Brut IPA. If you haven’t heard of it yet, Brut IPA is a new IPA-inspired beer style with a dry body, low bitterness, high hop flavour and aroma, and high carbonation. One core element of achieving such a dry and hoppy but not bitter beer is to only add hops during flame-out or whirlpool, to dry-hop in the fermenter, and most importantly, to use enzymes during fermentation to convert any remaining complex sugars into simple sugars that the yeast can turn into alcohol and carbon dioxide. This unique combination of dryness, hop aroma, and high carbonation apparently gives the beer a very unique mouthfeel and sensory experience otherwise only found in highly attenuated and carbonated styles like Saison.

Brut IPAs haven’t really arrived in Germany yet (I hear there’s one or two small breweries releasing some), so I haven’t had the chance to try any examples yet. But from everything I’ve read so far, professional brewers who have done the style emphasize the use of enzymes to produce a highly attenuated beer. The problem with brewing such a beer in Germany is that enzymes would be an additional ingredient that’s currently normally not allowed to be used in brewing. So how would a brewer get around it?

Maybe let’s just first talk what the enzymes really are about. Basically, malt contains enzymes, called amylase (alpha amylase and beta amylase, to be more precise) , that break long starch chains into shorter bits. Beta amylase chops off simple sugar on the end of such a starch chain, while alpha amylase chops it up at any point of the chain, producing shorter and shorter chains, eventually ending up with unfermentable dextrins, or given enough time, simple, fermentable sugars. It’s the foundation of mashing, really. These amylase enzymes work at an optimal temperature range, depending on the specific type, between roughly 60 and 75 °C.

The thing with enzymes in Brut IPAs is that they are often added to the wort at the beginning of or during fermentation. A common product for that is glucoamylase, also known as amyloglucosidase or gamma amylase. While its optimum temperature is about 65 °C, it will still work at normal fermentation temperature and help with chopping up the last few remaining dextrins into fermentable sugars.

So, if German pro-brewers aren’t allowed to use enzymes to add to the fermenting beer, how else would they be able to achieve such a highly attenuated beer? Fortunately, there’s a precedent in recent German beer history. In Germany, you used to be able to buy Diätbier (“diet bier”) until the use of the term was prohibited in 2012. Diätbier is essentially a fully attenuated beer with no carbohydrates in it left, and it used to be advertised to be suitable for diabetics. This of course ignored the fact that alcohol changes the way sugar is absorbed by the body, and was one of the reason why Diätbier is not a thing anymore. But how Diätbier was free from carbohydrates is what made it similar to Brut IPA. So if we wanted to brew a Brut IPA that complies with German beer legislation, all we needed to do was to brew it just like German brewers used to brew Diätbier. There are a few approaches, which I’ll describe here:

The crudest and simplest approach is to just add a certain amount of barley malt flour to the chilled wort or freshly fermenting beer. The amylase in the beer will get active and not only convert the starch from the barley malt flour, but also any remaining dextrins, and given enough time, produce a beer with no residual extract. The risk there is that not all the starch will actually get converted, and starches in the final beer can have a negative impact on the overall shelf stability.

A better way and slightly more sophisticated way is to just take some of the mash when it’s at 60 °C to make sure none of the enzymes have been damaged, lauter it, put the wort aside, and continue brewing as normal. When the main wort is chilled and yeast has been pitched, the wort put aside earlier can be added to it, and the enzymes now have time to convert the remaining complex sugars and dextrins.

But wort can easily spoil, so you can go even further and produce a sotrable malt extract that can be used as enzyme source in brewing by mashing in malt at up to 65 °C, lautering, chilling, and then fermenting it. Without a boil, none of the enzymes should get denatured. The resulting unboiled beer can then be filtered to free it from proteins and yeast and kept for a longer period of time. Since it’s beer, it can be blended with other beer and still totally be within the purity law. This method was even patented in the 1980’s to a German company.

Practically, it’s probably the easiest for homebrewers to use the unboiled wort method. I would consider using barley malt flour to be unsafe, not just because of the risk of introducing starches into beer, but also for a slight contamination risk. Fermenting and filtering an enzyme-rich wort is probably also not great for homebrewers as you need to plan ahead and actually have the equipment and facilities to filter and package the beer in an contaminant-free environment. So the easiest is just to take a bit of wort during the mash, set it aside, and then add it to the fermenter a few hours later.

There’s also another way of achieving such high attenuation: super-attenuating yeast. There exist variants of brewers yeast, such as Saccharomyces cerevisiae var. diastaticus, that produce their own glucoamylase to help with converting starches and dextrines. Saison yeast is a well-known example for this type of yeast. Unfortunately, most diastaticus yeasts are also known for producing phenolic off-flavours (they are “phenolic off-flavour positive”, or POF+). In Saisons, these phenols are appropriate, while in other beer styles, such as IPAs, where the hop flavour and aroma should shine, probably not so much. So far, there are only two known diastaticus strains that are POF- (i.e. don’t produce phenolic off-flavours), which are WLP026 (an English ale yeast) and WLP644 (a yeast that had previously been misidentified as Brettanomyces since it is known for producing some funky, Brett-like aromas and flavours). This method is probably most suitable if you want to produce a “Belgian-style” or funky Brut IPA.

So, to summarize, if you want to brew a Brut IPA, and for whatever reason, have to stick to German beer legislation, and can’t or don’t want to add enzymes to your beer, or you can’t buy any glucoamylase in your homebrew shop, here’s a method that has been used in the past to produce very dry, highly attenuated beers. Just be aware that I haven’t actually tried this method in practice. Not only is it slightly too warm to brew beer unless you have good temperature control, I also didn’t really have time recently to brew much. This is just based on theory I read about in German brewing books.

If you want to learn more about Brut IPA, there’s been quite a lot of good stuff out there recently.  The Craft Beer & Brewing Magazine‘s August-September 2018 issue has a focus on IPAs, with a great article specifically about Brut IPAs. The New To Brew blog also posted an article about how to design and brew Brut IPAs back in June. So if you want to brew the latest hyped sub-style of IPA, there’s plenty of material how to do it right.